You can define one or more Legal Entity profiles (sender or receiver) for a Business Unit. A Legal Entity is the record of the unique Buyer (receiver) or Supplier (sender) party, typically from a tax registration perspective, that exchanges compliant invoices through AIC. This is a company or a business unit or division within a company.
To define your legal profile(s)
|
2
|
|
3
|
|
4
|
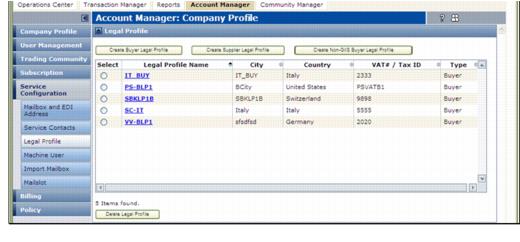
On the Legal Profile list page, to modify a legal profile, in the Legal Profile Name column, click the profile, then go to the next step.
|
|
|
Create Sender (Subscriber) Legal Profile and Create Non-GXS Receiver Legal Profile apply to an AIC Sender subscription.
|
|
|
Create Receiver (Subscriber) Legal Profile and Create Non-GXS Sender Legal Profile apply to an AIC Receiver subscription.
|
|
|
Create Receiver (Subscriber) Legal Profile, Create Sender (Subscriber) Legal Profile, Create Non-GXS Receiver Legal Profiles, and Create Non-GXS Sender Legal Profile are seen
|
For creating legal profile for Receivers, click Create Receiver (Subscriber) Legal Profile.
|
5
|
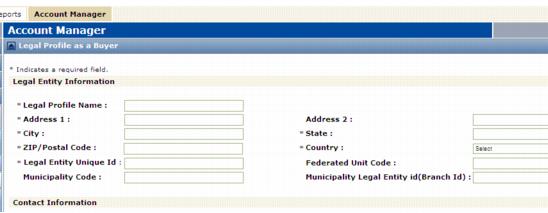
On the Legal Profile as . . . page, enter or modify the data to modify or define the profile. In the Legal Entity Information section, enter the required information about the location of the division, plant, or other entity for the profile.
|
For Legal Entity Unique ID, enter a unique combination of letters and/or numbers. A Legal Entity is the record of the unique Buyer or Supplier party, typically from a tax registration perspective, that exchanges compliant invoices through AIC. This is a company or a business unit or division within a company.
|
6
|
|
|
First the COMPLIANT countries are listed. These countries have a set of standards for doing business, as defined by its legal entity.
|
|
|
Then, the NON-COMPLIANT countries are listed. These countries have no specific defined standards.
|
|
7
|
|
a
|
Click Select Existing Service Contacts.
|
|
a
|
Enter the data for the first contact. All fields are required. Locale refers to the preferred language of the contact, not a country.
|
|
b
|
Click Add. This is required to save the contact.
|
|
11
|
Click Submit to save changes. Options display.
|
|
12
|
In the Signing Information section, specify the Process Type, that is, the output format in which to deliver signed invoices. Based on the Country selected, and the type of the Legal Profile, you will not see all of the following options. Select an option.
|
|
In the Legal Entity Information section, if you selected a NON-COMPLIANT country, you must select this option.
|
|||||
|
Active Invoice for Latin America with and without Duplicate Check
|
Applies to signed invoices in the countries of Mexico, Brazil, and Turkey for invoice processing requiring approval from Tax authorities. This process applies digital signatures to the invoice documents (PDF or any other format). AIC then sends a PDF version of the signed invoice.
This process is available with or without the duplicate invoice number check feature for invoice documents; select the applicable option.
|
||||
|
Same as Active Invoice Non-sign with Human Readable Image with a PDF “container” created to sign the invoices and then to send or archive these invoices with their related “artifacts,” or data, via PDF file(s).
|
|||||
|
Same as Active Invoice Non-sign with Human Readable Image with a PDF “container” created to send or archive unsigned invoices with their related “artifacts,” or data, via PDF file(s).
|
|||||
|
Same as Active Invoice Non-signed EDI except that a PDF document (human readable image) of the invoice is generated and sent to the recipient.
|
|||||
|
Same as Active Invoice Non-sign with Human Readable Image except that a duplicate invoice number check is not performed on invoice documents.
|
|||||
Note: For non-signed invoices, there is an additional requirement to maintain the Trading Partner List and Summary List. An active relationship between two legal entities (Receiver and Sender) is mandatory for them to exchange invoices; otherwise the invoices are rejected.
|
|||||
|
Same as Active Invoice Non-signed EDI except that the invoice number duplicate check is not performed on invoice documents.
|
|||||
|
AIC digitally signs the invoices on behalf of a Sender, provided the Sender is also selected this Process Type. Digital signatures are applied to the invoice (PDF or any other format). AIC then sends a PDF version of the signed invoice.
|
|||||
|
Same as Active Invoice Sign with an added duplicate invoice number check feature performed on the invoice documents. Duplicate checking ensures that a Sender cannot send multiple invoices with the same invoice number within the Sender’s fiscal year.
|
|||||
|
Same as Active Invoice Sign with TP Report List with an added duplicate invoice number check feature performed on the invoice documents. Duplicate checking ensures that a Sender cannot send multiple invoices with same invoice number within the Sender’s fiscal year.
|
|||||
|
Same as Active Invoice Sign with a PDF “container” created to sign the invoices and then to send or archive these invoices with their related “artifacts,” or data, via PDF file(s).
|
|||||
|
Same as Active Invoice Sign with an added Legal Entity Relationship check that generates a list of trading partners associated with the Sender.
|
|||||
|
Same as Active Invoice Sign with a PDF “container” created to send or archive unsigned invoices with their related “artifacts,” or data, via PDF file(s).
|
|||||
|
Same as Active Invoice Sign with an added feature that received signed invoice documents are validated for digital signatures.
|
|||||
|
Same as Active Invoice Validate with an added duplicate invoice number check feature performed on the invoice documents. Duplicate checking ensures that a Sender cannot send multiple invoices with same invoice number within the Sender’s fiscal year.
|
If you selected Active Invoice Sign, the page redisplays. 
|
a
|
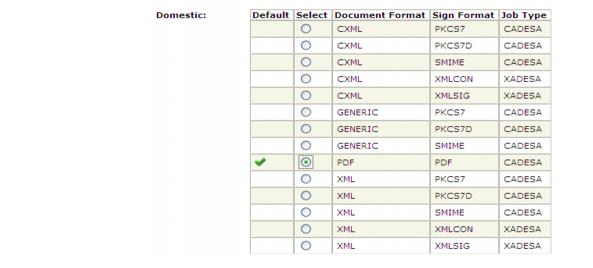
In the Digital Signature Information section, click Select/Update Digital Signature Information to enable the Digital Signature Information page for selecting the Document Format / Sign Format / Job Type for Domestic invoices (sender and receiver are in the same country) or Cross Border invoices.
|

Scroll down to the next section to select the combination for Cross-Border invoices (sender and receiver are in different countries).
Scroll to the bottom and click Select to add your selections.
|
b
|
In the Signing Information - Exceptions section, specify Suppliers that should not receive invoices for a specific Process Type. The Legal Entity Unique ID displays the first Supplier that you do not want to receive invoices in the selected Process Type.
|
For example, if a Sender (trading partner) selected the Active Invoice Sign process type and the Receiver selected the Active Invoice Non Signed process type, the Receiver can create an exception for the Sender by specifying the Sender Legal Entity Unique ID (VAT / TAX Id) and then selecting the preferred process type. 
In the Process Type Documents Information Archive section, from the a list of documents relevant for the selected exceptions Process Type), select document types from the list. Press the Ctrl key to make multiple selections. 
Click Add. You might need to scroll to the right to see the button.
Repeat for each Supplier to make an exception for.
|
c
|
Use the Process Type Documents Information Delivery section in the same way as the previous step.
|
|
d
|
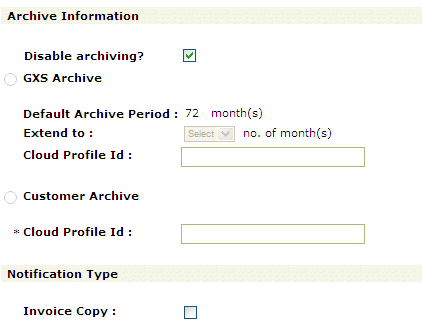
The Archive Information section displays the Default Archive Period for the country in which this entity is located. .
 |
To disable invoice reports archiving, select Disable Archiving?
If you do not disable archiving, do one of the following.
|
|
Select GXS Archive as your archive. The Default Archive Period, is based on the country of this profile. You can use the Extend to option to extend this period for each invoice by a number of months.
Enter your Cloud Profile Id, which is your Cloud Archive Service (TG-CAS) identification. If you want a URL link to access the archived files, select the Archive Link option, and then select a Delivery Mode of Email or GXS Supported Communication Methods in Step 14. |
|
|
|
13
|
In the Notification Type section, select the alerts and documents to deliver to the Contacts defined in this profile.
 |
|
|
Invoice Copy to deliver a copy of the unsigned invoice.
|
|
|
Success Alerts (Suppliers only) to deliver a "success" email after the invoice is successfully sent.
|
|
|
Error Alerts (Suppliers only) to deliver an "error" email if an error occurred and the system could not deliver the invoice.
|
|
14
|
In the document Delivery Mode section, for delivery of AIC-generated documents (not yet archived) to the service contact (default contact in case of a signed/validated document).
|
|
|
Email to deliver the documents via email attachments. The maximum number of document attachments delivered is 10 per email.
|
|
|
GXS Supported Communication Methods to use GXS-supported communication methods in which the compliant invoice package is delivered to the TGMS mailbox from where GXS can forward it to the customer using any GXS-supported communication method, e.g., AS2, FTP, etc.
|
|
|
Secure Email Delivery to deliver the documents via a secure link in an email. For more information, see “Secure Email Delivery” on page 373.
|
|
|
Web Services to deliver the documents to Spain or to the Italian Government. This applies to Non-GXS Receivers only.
|
For signed invoices, documents delivered are:
|
|
Invoice copies, if selected in the Notification Type section (previous step).
|
For Non-signed EDI invoices, the Summary List is delivered.
|
15
|
For the document delivery Type, select either:
|
|
|
Real Time Delivery to archive and deliver invoice-related documents when they are generated.
|
|
|
Delayed Delivery to archive and deliver invoice-related documents after all artifacts (for example, audit trail, summary, etc.) are generated.
|
|
|
Suppress invoice data delivery . . .? to suppress delivery of the original file (submitted by the Supplier) to the Buyer mailbox.
|
|
|
Deliver Compliance Package to deliver all of your documents related to an invoice. The default for this option is Delayed Delivery, which submits the compliance packages once per day.
|
|
|
Submit compliance package as zip to deliver the artifacts as one package in zip format.
|
|
16
|
(Suppliers only). In the Human Readable Format section, you can specify that a logo or additional information display on invoices sent or received.
 |
|
a
|
In the Locale dropdown, select the language of the logo or user-defined field.
|
|
b
|
To specify a logo, enter the name of the logo file or click Browse to find and select it. It cannot be larger than 10 megabytes.
|
|
c
|
Click Upload. The page redisplays showing the logo. You might need to scroll down to see it.
|
|
17
|
(Suppliers only). To specify additional fields to appear on invoices, in the User Defined Fields section,
|
|
a
|
|
b
|
Click Add to save the information. The page redisplays showing the field you entered. You might need to scroll down to see it.
|
|
18
|
Click Submit. Your profile displays on the Legal Profile list page.
|


